$20 Flat Rate Shipping to Contiguous U.S.
Currency
Get Reactive

Get Reactive

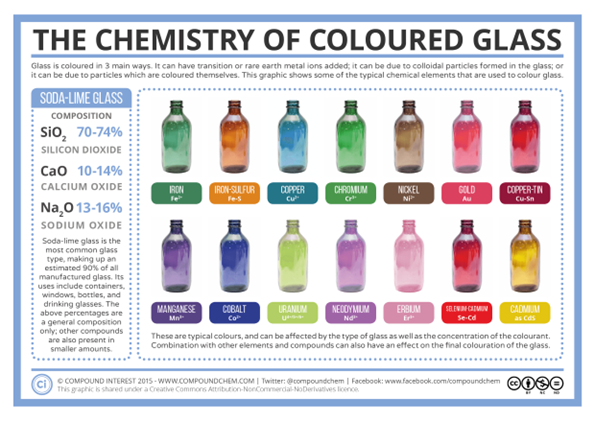
Glass is made from sand, limestone and sodium carbonate. To get stained (colored) glass, other minerals are added.

Glass Pigments

Compounds Colors
iron oxides greens, browns
manganese oxides deep amber, amethyst, decolorizer
cobalt oxide deep blue
gold chloride ruby red
selenium compounds reds
carbon oxides amber/brown
a mix of manganese, cobalt, iron black
antimony oxides white
uranium oxides yellow-green (glows!)
sulfur compounds amber/brown
copper compounds light blue, red
tin compounds white
lead with antimony yellow
Because these minerals are in the glass, they can react with one another when they come in contact. Some products have been developed for just that purpose. Oceanside has frit and glass called Red Reactive transparent and Red Reactive opal. It will react with any glass that has copper in it. It will give a deep reddish color where the reactive frit and copper-bearing glass intersect. Oceanside Compatible Red Reactive Opal Coarse Frit 96 COE (stainedglassexpress.com) Oceanside Compatible Red Reactive Opal Frit Fine 96 COE (stainedglassexpress.com) Oceanside Compatible Red Reactive Opal Frit Medium 96 COE (stainedglassexpress.com) Oceanside Compatible Red Reactive Opal Powder Frit 96 COE (stainedglassexpress.com) Oceanside Compatible Red Reactive Transparent Frit Coarse 96 COE (stainedglassexpress.com) Oceanside Compatible Red Reactive Transparent Frit Fine 96 COE (stainedglassexpress.com) Oceanside Compatible Red Reactive Transparent Frit Medium 96 COE (stainedglassexpress.com) Oceanside Compatible Red Reactive Transparent Frit Powder 96 COE (stainedglassexpress.com) Oceanside Red Reactive Opal Stringer 96 COE (stainedglassexpress.com) Oceanside Red Reactive Transparent Noodles 96 COE (stainedglassexpress.com) Oceanside Red Reactive Transparent Stringer 96 COE (stainedglassexpress.com) Sulfur-bearing products will also react with copper bearing products. The link below will bring you to Oceanside’s Reactive charts. Reactive Guide – Oceanside Art Glass (oceansidecompatible.com) Vanilla Cream is a high sulfur content glass that is also reactive, it even changes from within. After full fusing the inside of the glass stays its pre-fused off-white color while the outside brightens to a vivid warm white. Oceanside Vanilla Cream Opal Glass (stainedglassexpress.com) Bullseye also has reactive products. Bullseye Reactive Cloud Opal Frit- Medium 90 COE (stainedglassexpress.com) Bullseye Reactive Cloud Opal Frit- Powder 90 COE (stainedglassexpress.com) This is a link to the Reactive Potential of Bullseye Glass. It is truly amazing and very fun to play with these combinations. Reactive Glass Chart.pdf (amazonaws.com)
Read more
Modeling Glass

Modeling Glass

MODELING GLASS

Ever wish you could get more detail on a project? Modeling Clay is the answer. It was developed by Glass Bird Studios. It is a two-part kit that has a powdered binder and liquid medium. It is mixed with water and your own powdered glass or frit. Once it is mixed, it is the consistency of clay and you can work it like clay. It is food safe and non-toxic. You can pretty much do everything with it that you do with clay. Roll it, cut out shapes, put in silicone molds. You can then fire to a tack and get amazing detail.
Glass Bird Modeling Glass Starter Kit (stainedglassexpress.com) Lois Manno, the owner and developer of Glass Bird Modeling Glass, is a talented, experienced artist. Her love of nature shows in her artwork. She is most known for her feathers made from Modeling Glass.
This incredible image is made by Bob Leatherbarrow, who is one of our industry’s amazing artist and teacher. He created the lines with Modeling Glass.
See more of this work at www.leatherbarrowglass.com
Read more
Specialty Frits

Specialty Frits

SPECIALITY FRITS

Frit is crushed glass, ranging in particle size from a fine powder to fine, medium, coarse and mosaic. It is made from crushed, screened and cleaned COE tested sheet glass. It is used by artists as a coloring agent or used to created decorative effects when blowing glass or fusing. Often used to achieve the effect of painting on glass.

Metallic Irid Frit

Metallic Frit is to give a silver/gold metallic shimmer in fused work. Doesn’t look like much in the bottle but once fused it will stand out. It IS different from rainbow irid frit. It looks best over dark colors or black to achieve the dramatic multi-layer metallic shimmer. It is available in Medium, Coarse and Mosaic sizes.

Clear Rainbow Irid Frit

Rainbow Iridized adds a mother of pearl shimmer to your fused work. It is made from Iridized glass which has a surface treatment where a layer of metallic oxide is bonded to the hot glass surface just after the sheet forming, resulting in a colorful, shimmering effect.

Red Reactive Frit

Comes in both opal and transparent. This frit works with chemistry and heat to create stunning effects. Red Reactive has elements that will react to the metal content in other colors and create unique color shifts and rings. A normal reaction would be a very thin line in a reddish hue around the added glass embellishments. Reactive Guide – Oceanside Art Glass (oceansidecompatible.com)

DICHROIC FRIT

(this info from Coatings by Sanburg)

Dichroic coating is made by melting Quartz Crystal and Metal Oxides. These Materials are vaporized with an electron beam gun, and the vapor then attaches and condenses onto the surface of the glass, forming a crystal structure comprised of as many as 30 layers. Dichroic frit is not sheets of glass with a dichroic coated smashed up. It is already frit and then it is coated with a dichroic coating. That means that more of the surface is coated. Approximately 80%. It also comes in colors but the black and the clear are the most popular.
Read more
Sometimes You Just Want to Keep Looking

Sometimes You Just Want to Keep Looking

This is the 2022 1st place winter in the CBS Dichroic by Design Contest

The artist is Jackie MacDonald of New Zealand

This piece is called “Memories of Christchurch.

2022 Winners | Dichroic Glass Manufacturer | Coatings by Sandberg (cbs-dichroic.com)

Below is a link to an amazing display of her work along with Stephen Coote:

(64) JackieMac Art, Nelson New Zealand - YouTube

Read more
THE ART OF RESTORING GLASS

THE ART OF RESTORING GLASS

One of the very exciting things we get to do in this industry is to restore windows. These are generally from churches, and they are usually over 100 years old. It is just fascinating to see the beauty of these windows and the skill (they did not have the tools and equipment we have) it took to make these windows. One of these jobs was in 2008 when we had the privilege of restoring two windows from the First Congregational Church of Blue Hill. We were told the windows were originally made by Alfred E. Bell, a renowned stained glass artist of the 1800s. These windows were 6’ by 12’ and were exceptionally heavy because they were all plated. Each piece was at least two layers thick, and some were three layers thick. That created some interesting challenges in the restoration. Another exciting job we did was a window called the Traveling Angel. It was from the Fairfield United Methodist in Fairfield Center, Maine. This window was made by the Belcher Glass company based in New Jersey. It was a unique process. It involved placing tiny pieces of glass on a paper pattern. When I say tiny, I mean like fingernail size! The pieces of glass and the pattern were then covered on both sides with a gummed sheet of asbestos. A frame was placed around the outside edges of the glass-filled asbestos sheets to seal the glass. Molten lead was then poured between the asbestos sheets, filling the gaps between the small pieces of glass. When the metal cooled, it bound the glass pieces together. There were very few of these windows made because the process was toxic, and the workers died! There are approximately 30 of these windows in existence. This picture shows a glazier, Lisa Lucas, from Oakes & Parkhurst Glass helping us reinstall the window after we flattened the curve in it, fixed the painted the face and did some other repairs including rebar to strengthen it. For the first time we offered a class in restoration! It seems there are more pieces of glass to be restored than the time and people to do it. We hope that some of the students will continue to work on their skills and eventually start taking on restoration jobs. The pieces they restored were likely originally installed in the old Methodist Church in Fairfield, Maine (though that building burned long ago and their provenance is not definite.) There were eight panels in various states of decay, and some of them were missing several pieces of glass. They were also each unique, despite being a "matched" set. Some had round faceted crystals in the design, and all had slight variations in glass color. It was an intensive process that took some students weeks to complete. Here you can see some of the detailed steps, the immense satisfaction of a completed project, and 3 very different final interpretations of the restored windows. Want to be notified when we publish a new blog post? Sign up Here
Read more
A Trip to the Morse

A Trip to the Morse

I recently visited The Charles Hosmer Morse Museum. It was my third trip, so that tells you something. The bonus was that I took my adult daughter, Soo, and she absolutely loved it. It is in Winter Park, Florida, just north of Orlando. Winter Park is a college town and has delightful shops and wonderful restaurants. We sat on the street and had broiled oysters with cheese and luscious drinks. It is the most comprehensive collection of the works of Louis Comfort Tiffany. Things you can see are Daffodils, the Four Season, Pumpkins and Beets. The glass is just unbelievable. Tiffany would make the glass for the piece that was being made so it is amazing. In addition to these individual works are two complete rooms from the Tiffany estate. The Tiffany Chapel is breathtaking. Laurelton Hall’s Daffodil Terrace, Reception hall, living room, dining room and smoking room. Price of admission? Most Fridays free. Other days $6.00 and less. If you are in Florida, don’t miss it.
Read more
A tiny Allen wrench is being used to loosen the screw on a bench burner.

Torch Maintenance

All credit for this blog entry goes to Bethlehem Burners. This is from their website. A tiny Allen wrench is being used to loosen the screw on a bench burner. Helpful Tips from Bethlehem Tip # 1: Do not use force when cleaning your torch. Using extra force when cleaning your hypo tubes may cause internal damage to the torch. Such as scraping or breaking the hypo tubes which can lead to internal premixing. Only use gentle strokes and only use smooth wires. Cleaning wires with barbs or deep ridges on them will scrape and scratch the inside of the torch hypo tubes, weakening them over time. If you cannot clear an obstruction with the cleaning wires provided, please call us for assistance. (610) 838-7034 Tip # 2: Heat Tint Bethlehem Burners uses 303 stainless steel for the burner faceplates and torch barrels. Stainless steel develops a tint or coloring when the metal is exposed to heat and air. Heat tint found at the face and around the front of the torch barrel is to be expected and will darken with continued use. This discoloring is normal and purely cosmetic. Tip # 3: Removing Heat Tint Removing heat tint is not required maintenance for proper torch use. If the flame worker would like to remove the heat tint, simply rub a plastic dish-scrubbing pad (Scotch Brite) in a circular motion, until the heat tint has been removed. DO NOT USE STEEL WOOL. Steel wool will scratch the metal of the torch. Tip # 4: DO NOT SHOCK YOUR TORCH. Placing a hot torch face in cold water to “shock” trapped glass free from the torch will weaken the torches connection sites. Metal expands and contrasts when heated and cooled, therefore any connection site on the torch formed by fusing metals together, will become weakened if the metals have been heated and then cooled rapidly (shocked). Tip # 5: Do not use wires to remove glass Do not use the provided wires to remove glass. If glass becomes lodged inside the torch ports, please contact Bethlehem Apparatus for expert advice on how to remove the glass. (610) 838-7034 Tip # 6: Ask us about your torch! If you find yourself questioning what to do about your torch, give us a call and we will be glad to help! (610) 838-7034 TORCH CLEANING INSTRUCTIONS The working life of a Bethlehem torch is greatly enhanced when properly cleaned. Removal of carbon deposits on the face of the burner will prevent hot spots and deliver a clean particle free flame. Our new Stainless steel torches (Alpha, Bravo, Champion) have more oxygen ports in proportion to gas ports. This prevents carbon build-up; therefore these models do not require cleanings as often as our previous models. Step 1. Shutoff torch and allow cooling down for 10 minutes. Step 2. Gently brush the torch face in a back and forth and up and down motion for about 6 minutes. Step 3. Clean gas & oxygen ports with the two wires provided. Using the small wire for the smaller oxygen ports and the larger wire for the larger gas ports, located on the front face of the torch. The pentagon shaped center fire has 6 thin walled stainless steel hypo tubes. The hypo tubes deliver gas and the surrounding ports deliver the oxygen. NEVER USE COPPER, GLASS STRINGERS, TOOTH PICKS, OR ANY OBJECT THAT CAN BREAK AND CLOG THE PORT. Step 4. Turn on the torch with a lot of gas and oxygen and hit the underside of the torch with the supplied wooden dowel (never use a hard object to jar out any dust and carbon that may have entered the gas and or the oxygen ports during steps 1 and 2. Step 5. Shutoff torch and allow cooling for 10 minutes. Step 6. Brush torch face again, same as step 2. Step 7. Turn on torch with a lot of gas and oxygen and hit the underside of the torch to jar out any dust and carbon that may have entered the gas or oxygen ports during the brushing and wire cleaning cycle. Step 8. Shutoff torch, torch is now all clean and ready for your next days work.
Read more
So Many Pliers!

So Many Pliers!

SO MANY PLIERS! When customers are new to stained glass, it can be overwhelming figuring out which tools to buy. As if choosing a soldering iron wasn't complicated enough, something that seems as simple as pliers ought to be easy, right? Maybe not! There are several tools that are used for breaking glass along a score. We suggest beginners start with a combo breaker/grozer. It is like two pliers in one. You can use the pliers to break the glass on the score line. Position the edge of the plier parallel to the score line with the curved jaw on the bottom. Holding the glass on the other side of the score with your hand, snap up/pull the piece apart. (Use a pair of grozing pliers on each side to break narrow pieces.) Once you've cut a piece, small bits that stuck to the score can be "chewed" off with the tips of the pliers. Just nibble those little bits right off to reduce the amount of grinding in your future. Then we suggest a runner. The jaws of a runner are slightly curved to create a fulcrum. There is a line on the tip of plier that you'll lay over the score line. Some runners have an adjustable screw to control pressure; the screw should be on the top side of the pliers (screw points up so you don't screw up!) Squeeze gently to start; you'll feel the score "running" away from you along the cut. The rubber tips eventually get torn up by the sharp glass and it really does make a difference in the pliers' performance. Get reasonably priced replacements here. There are other variations of running pliers that run the gamut of cost and function. The Silberschnitt pictured on the right is a high-end plier designed to be very exact and can break up to 5mm of glass. They can help with inner curves and small glass strips. Some people really like a plain breaker. These pliers have a smooth jaw for snapping the glass apart. They often have a wider jaw than a grozer. What are your go-to tools for breaking glass along a score? Which tool did you wish you had as a beginner?
Read more
Featured Artist-Remembering Fred Tenenbaum

Featured Artist-Remembering Fred Tenenbaum

A friend of mine on Facebook posted this a picture of sandblasted panel that is in his home. He said “do any of you remember the glass artist from Canaan, Me., Fred Tenenbaum? He did this panel." My response was, “I sure do, without Fred, Stained Glass Express would not exist." Time was, we owned a glass store in Winslow, Maine, named Oakes & Parkhurst Glass. It was a full-service glass shop offering commercial glazing, residential glazing, and auto glass. (O&P is now owned and operated by two of our children, Soo and Tobias.) I am not sure of the date but sometime in the early 1980s Fred came to us and asked if we could get stained glass. We brought in a small amount, made a small glass rack, and put it in the corner. As we expanded O&P Glass, we also put a small amount of stained glass and supplies for the stained glass artist/hobbyist in each of the other 5 locations (Belfast, Skowhegan, Farmington, Glenburn, and Manchester). Then in 1988 circumstances prompted us to buy a single location and make it good enough for all our customers to travel to. We bought and renovated a building in Waterville, Maine at 10 Railroad Square. By 2015, our son had bought O&P and the business we were doing in stained glass had totally outgrown that space. We moved to our current property in Manchester which is full floor to ceiling (it feels like!) with stained glass, fusible glass, specialty cabinet glass, tools of all the glass arts and trades, and so much more. All thanks to Fred's simple request 40 years ago! Fred was a very talented artist who did not only sandblasting but copper foil and lead came work. His studio was called Northern Lights Glass Studio. While writing this blog entry, I had not been having luck finding any more pictures of his work and was feeling disappointed. When I handed over the blog to be edited by our new Glass Academy Director, however, she recognized some of the names. (It is such a small world!) Within a few days I had been connected with Fred's widow, Eve. She sent me this photo of Fred's first ever piece, and I was moved to tears. Here is Fred's obituary, published on legacy.com by Central Maine on Jul. 31, 2018: "1941 - 2018 CANAAN - Fred Tenenbaum, 77, of Canaan, died peacefully at home surrounded by his family on July 27, 2018. Fred was born in St. Gallen, Switzerland, on May 14, 1941, and immigrated with his parents to Brooklyn, N.Y., as survivors of the Holocaust. He moved back to the land in Maine in 1970 where he spent nearly 50 years building a home with his wife, Eve, in Canaan. He was an accomplished stained glass artist, creating and restoring windows all over Maine and beyond as Northern Lights Stained Glass. He also taught at the Skowhegan high and technical schools for many years. He loved to garden and travel, he was a true crafts person and was loved dearly by all that knew him. Fred leaves his wife, Eve; daughters Marissa and Aliza, sons-in-law Rob and Mike; and four grandchildren." Edited on August 9, 2022 to add a photo of Fred's window at the Skowhegan Town Office and several other photos of his work, generously shared by Eve: 
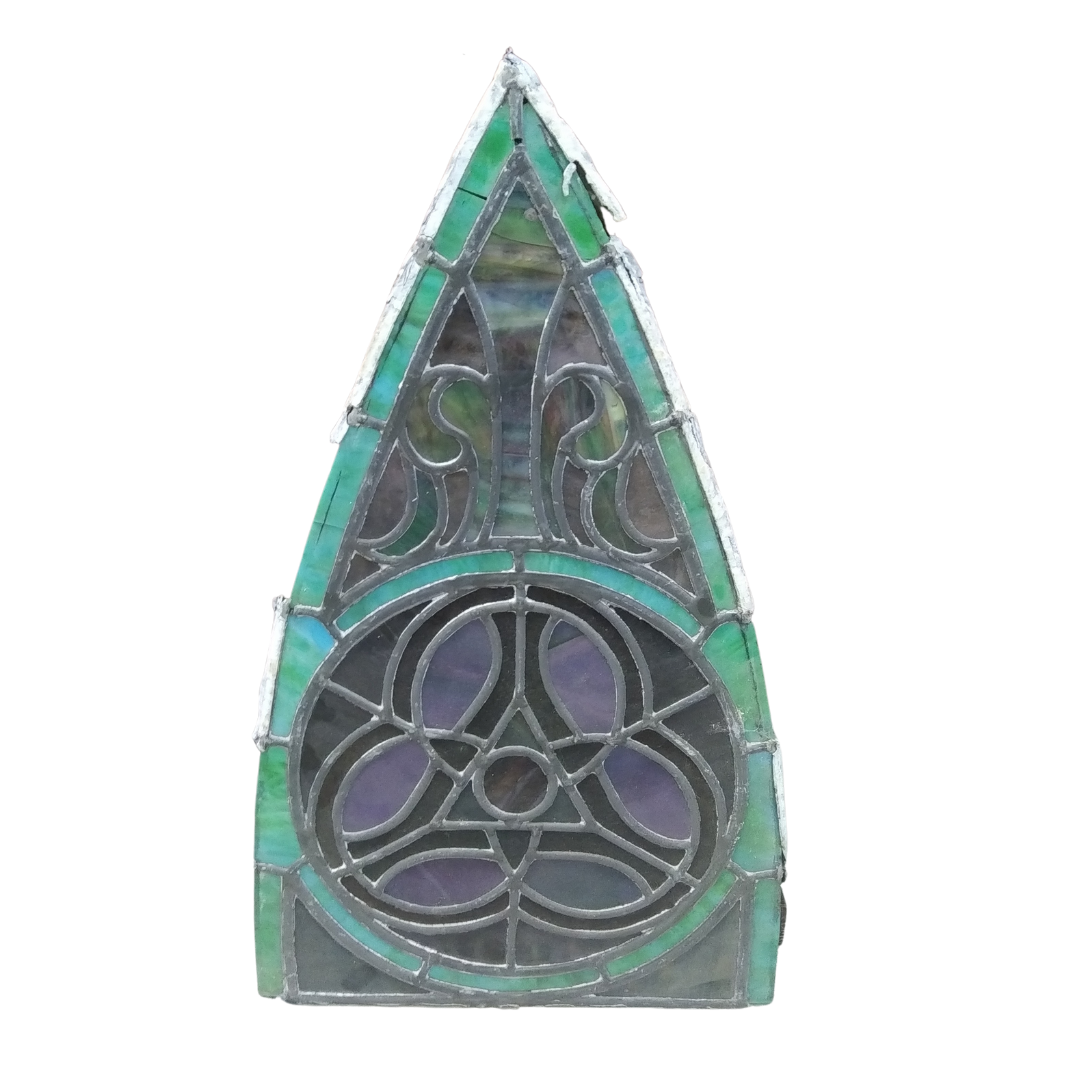
Edited on October 24, 2022 to add more photos of Fred's beautiful work:
Read more
Kiln Mold Preparation

Kiln Mold Preparation

One of the most confusing issues in the industry is mold prep. Part of this confusion has come from the elimination of some products and the decision on what to substitute. One of the recent questions I've had (and hear often) is What the difference is between the Hotline primers? These are used on your kiln shelves and some molds. Here's a breakdown: The Original Used according to directions, shelf primer is the best insurance that your fused work will not stick to the kiln shelf. It's a high temperature, low-fluxing clay and alumina mixture formulation which contains suspension agents and a color-coded dye that burns off at 800 degrees F (427 degrees C). Primo Primer Hotline Primo Primer fires to 1550 degrees F (843 degrees C) and higher. Glass does not stick to the shelf. Primer does not stick to the glass. It removes from shelf after firing by brushing or by wiping with a damp sponge. No more tedious and messy scraping. Packed in easy access plastic containers. Hi-Fire A special formulation of alumina and low-fluxing clays developed to withstand the high kiln temperatures required for raking. Contains a dye which burns off when firing. It leaves an excellent smooth finish between the glass and kiln shelf. Hi-Fire Shelf Primer is also excellent for coating mandrels for beadmaking. HOW TO PREPARE DIFFERENT TYPES OF MOLDS Bullseye Molds Can generally be prepped with kiln wash/primer. Colour de Verre Molds You can tell if you have a Colour de Verre mold because they put their name into the mold on the underside. These can be primed with Hotline Primo Primer or ZYP. Colour de Verre has some great information about preparing molds with Primo Primer and with Zyp. Creative Paradise Molds Creative Paradise recommends that you use MR97/ZYP for their molds. You can tell if your mold is from Creative Paradise because it says CPI right on the underside of the mold. Do not use Slide or kiln wash. Stainless Steel Molds FIRST: If the mold is new, it might still have the oil on it from production. The oil must be removed. You can simply put the mold in the kiln at the temperature you will be using it and fire with no glass. That will burn off the oil and the mold will also change color. Another method to get the mold ready for priming is to rough up the metal surface to provide texture for the kiln wash to stick to. Sandblaster is best, but if you don’t have access to one you can use 80 or 100 grit sandpaper. To prime, first heat the mold. Put tin foil or a cookie tray on the lid of a kiln while it is firing and put the mold on it. When the mold is heated apply kiln wash with a brush. It may not totally cover on the first coat. Let dry and apply again on the bare spots. Do at least three coats once you have the first total coat. It will be good for several firings. When you must recoat, scrub the mold with warm soapy water and a scrubber. Apply a coat or two of primer, let the primer dry and you are ready to slump.
Read more
Glue in the Kiln

Glue in the Kiln

There is a lot to chat about when it comes to glue in glass fusing. Let’s start with these cute little owls with wonky eyes. They started out with the pupils glued to the white nugget eyes. Since the glue cooks off at about 450F, the eyes just slid off the nuggets and landed where they wanted during firing! Solution? Drill a bit of a hole and the little dots will stay put and you will have sweet little eyes like the one in the second picture (done by Liz Watts of Rocky Coast Treasures). There are many different glues that behave differently and have different uses. Let's take a look at a few! GlasTac Blue Gel This blue gel has a thick viscosity and minimizes slipping even when not dry. GlasTac Pink Use the pink glue on something already set in place. The pink glue is runny and if you squeeze a tiny drop next to the element it will wick under the glass. Aloe Vera This is good for when you don’t want it to “set up”. It keeps pieces stable, but you can keep moving them about. Best to use generics because the name brands have added ingredients that can cause trouble. Hair Spray When do you use hair spray on your hair? When you are done! Same with using it on glass. It is a top-down adhesive. You spray to keep something as you have it, especially little things like fine frit. Buy it cheap with a pump. HoneyDoo Glue A gel consistency with quick set times and a clean bond. It has a stiletto tip nozzle which allows precision. Great for glass fusing. Super New Glue Our favorite super glue here at Stained Glass Express, it is formulated to dry clear. It comes in a tiny bottle so you don't have to worry about it drying out before you get a chance to use it! SOME GLUING TIPS: Put glue close to the edge of the top piece so that it can dry quicker. Stuck to the wrong place? Hopefully you put the glue near the edge! Use a razor blade to carefully scrape at the glue. Superglue that is not specifically designed for fusing may not dry clear and can give off toxic fumes during firing. Here is some helpful info. How do I unstick my fingers? (This section reproduced from How Stuff Works) Let's say you're repairing some broken pottery and before you can say "Whoops," you've glued your index finger to your thumb! The recommended first aid treatment for this is:
  1. Scrape off any excess glue. Don't use cloth or tissue -- a chemical reaction between the fabric and glue could potentially cause burns or smoke.
  2. Soak the bonded fingers in a bath of warm, soapy water.
  3. Don't try forcing the fingers apart, or you'll tear the skin.
  4. After soaking, use dull, rounded utensil to carefully wedge the fingers apart.
  5. If you see no immediate success with this, drop a little acetone (found in nail polish remover) on the area. Again, try wedging the digits apart.
At first, the thought of someone getting Super glue on his or her mouth seems outlandish. But let's face it a lot of us have a bad habit of using our teeth to wrench or twist off particularly stubborn caps. Say you do that with the top of the tube of glue and, presto, you've given an entirely new meaning to the phrase "zip it." In order to unzip those lips, your options on what to do are a little more limited:
  • Since you're dealing with an area on the face, do not use acetone.
  • Using a wide coffee cup or bowl, immerse your mouth in hot water.
  • You will also want to dampen the bonded skin from the inside of your mouth as much as possible.
  • Once you sense a loosening of the grip, use a dull, rounded utensil to wedge your mouth open. Be careful not to force it, or you will tear the skin.
Of course, glue is made for keeping things together; researchers have modified super glue to become less toxic, making it an ideal replacement for stitches (even veterinarians use it!) So if you've got yourself stuck and find the instructions above aren't working, we recommend you seek professional medical help! What's your favorite type of glue for fusing? Have you experienced any kiln disasters that eventually came down the type of glue that was used? Let us know in the comments below!
Read more
Just For Fun Contest Winners 2022

Just For Fun Contest Winners 2022

What amazing talent by every participant this year for our annual Just For Fun Contest! Here are our 2022 winners in each category:

Read more
229 results